Content
MAX IN HIS DREAMLAND :: TUTORIAL
:: MAX IN HIS DREAMLAND ::
The Overall Tutorial
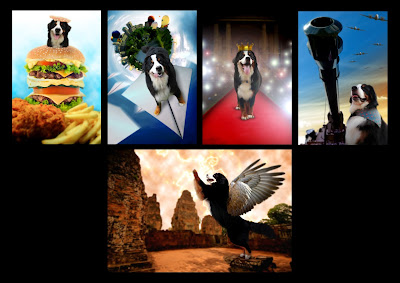
Anyone can learn Photoshop! Whether you are a photographer, designer, professional or even amateur. Photoshop (PS) is a software that is fun, simple and importantly, users-friendly. Users will gain a lot of touch-up and editing skills through this software. Photoshop, in a more general way, focuses on the tools and techniques that users need to know and learn
How I created the 5 theme pictures? Most importantly, we need to know the basic parts of PS. Always remember the task of SELECT, COPY and PASTE. I adapted these 3 steps into all my artworks. SELECT required you to select the object that you need to use for the editing. How to select the object from the picture? I personally recommend users to use PEN TOOL to select the object because it is more accurate especially for messy background pictures. LASSO TOOL and MAGIC WAND TOOL are recommended for pictures with plain backgrounds or contract backgrounds. All these tools have their own advantages and disadvantages. Users need to decide which is the best for them to do their editing work.
COPY and PASTE are two commands that must be done together just like using a pair of chopsticks. After selecting the object with the tool, copy and paste it to the new layer. Don’t paste back to the background layer. It does not allow users to move the object again. The advantage of PS tool is that it enables users to create as many layers as you want, even though a simple shadow. Do not bother about the file size when you do the editing job, the more layers the bigger the file size. No one will penalize you if the file size is big, but people will do so if they can’t edit your file in the future.
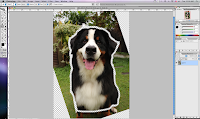
For my entire 5 pictures, I used ERASER TOOL to create an outline for the dog before I used LASSO TOOL to select the particular picture (Refer Theme 1 :: TUTORIAL). The other way to select the dog picture is the PEN TOOL, and then apply FEATHER from the SELECT. I personally prefer ERASER TOOL because I am able to control then decide which parts of the dog picture that need fluffy effect.
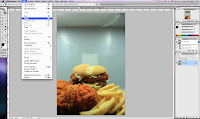
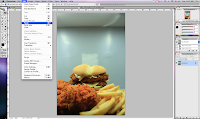
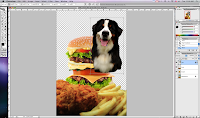
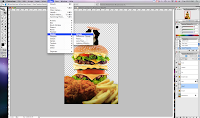
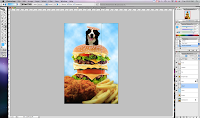
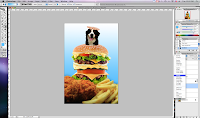
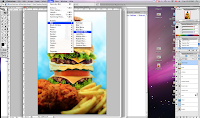
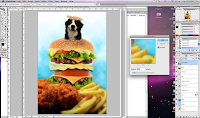
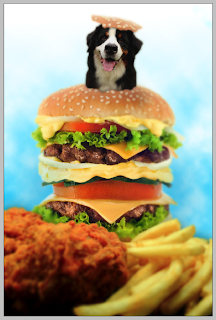
In each theme, I used different kinds of techniques to do the background effect. Theme 1 (Max and his Gluttony Fantasy). The whole artwork is a combination of 3 images; front, middle and the dog. The front part I edited it with BLUR to create a depth for the artwork. As for the cloud background, I used CLOUD from the RENDER (Refer Theme 1 :: TUTORIAL) and modified it with OVERLAY to create a gradient colour background. Another possible way to do the same effect is using a MASK. This theme is generally suitable for beginner learners to learn the different kinds of basic PS tools and skills.
Theme 2 (Max and his Yearned for Courageousness). Most of the editing steps for this theme is almost similar with Theme 1. What make this artwork different is the background and some extra editing work on the dog. I superimposed a pair of wings to the dog. I started with the front wing. Pasted it from the original picture, and used ERASER TOOL with lower FLOW; maybe around 20% to 30%. To make sure it looks natural, I erased the part between the wing and the dog’s body. This is to make sure it looks natural and smooth. UNDO it if you feel something is not right (Refer Theme 1 :: TUTORIAL tips). Then I duplicated another wing for the back wing. Use TRANSFORM to adjust the shape and the perspective of the other wing. As background, I created a LIGHTNING EFFECT in the sky to make the whole picture looks more dramatic. First, I selected the sky with MAGIC WAND TOOL and applied FEATHER. Then applied GRADIENT and created the effect with DIFFERENCE CLOUDS from RENDER. This artwork is suitable for intermediate learners.
Theme 3 (Max and his Soaring Over the World). I would consider this artwork to be the toughest among all artworks. It required a lot of times and patience. It is suitable for advance learners. Besides good PS skills, users also need to be a good photographer in order to complete this artwork. To create that polar panorama photograph, I combined few photos to create the panorama. This combination in the merging stage can be done in PS by dragging each photo to a new layer and then merge the photos. After created a complete panorama photo, I edited it with POLAR COORDINATES from DISTORD filter. After the filter, the panorama photo still looks a bit weird so I used CLONE STAMP TOOL, ERASER TOOL and even BRUSH TOOL to make it looks nicer and natural. For the paper plane, I only used one photo and duplicated it to few more layers. Remain one layer for the dog and then edit the others with TRANSFORM and MOTION BLUR for the speeding effect.
Theme 4 (Max and his Megastar Desire). Very easy work for this theme. A basic PS skills but added some LENS FLARE from RENDER filter to create a camera flash effect. I also added a crown for the dog. Just cut and paste and finally use ERASER TOOL and add some shadow with BRUSH TOOL, so that it looks like the dog wearing the crown. Easy and suitable for the beginner learners.
Theme 5 (Max and his Fearless Valour). This also requires easy PS techniques to complete this artwork. I used MASK to create the sky with 2 colours. Besides that, I duplicated the planes and transformed it according to the depth and perspective.
To match the overall dream concept, all 5 pictures were applied with GAUSSIAN BLUR from BLUR at the end of the project to create the dreamy feel. Besides that, I adjusted the colours with BRIGHTNESS, CONTRAST, HUE/SATURATION, SHADOW, EXPOSURE, LEVEL, and CURVES etc. All these can be found in IMAGE /select ADJUSTMENT.
There is no limit in the knowledge in this versatile Photoshop software. Good Luck!
Tips:
1. Research: How people create it
2. Reference: Refer to the existing project
3. Sketches: You know what ‘s the final outcome of the project
4. Patience: Try varieties of PS tools and filters
5. Fun: Always practice and you will soon enjoy and learn new effects
Theme 5 :: MAX AND HIS FEARLESS VALOUR
:: MAX AND HIS FEARLESS VALOUR ::
Max is a pet who pampered a lot, he is still a guard dog himself who knows to take care of the house. He is alert and vigilant dog who know to protect the house and his master’s family. House is everything for him as a shelter for him and he protect it like a soldier who protect his country by serving his army. The big tank represent his voice, as his bark is so thunderous that it can alert everyone in the house, even the neighbours nearby.
Theme 5 :: IDEA
No doubt Max is a friendly dog, but he is also a good guard dog. He know how to look after the house. He will bark to let me know that outside the house there are people walk around or any other animals such as cats and squirrels. Besides that, every time a unfamaliar person wants to come near me, he will protect me by standing or sitting in front of me. Sometimes he evens bark at the person. He maybe thinking that he is an army general protecting his territory (home) and owner.
THEME 4 :: MAX AND HIS MEGASTAR DESIRE
:: MAX AND HIS MEGASTAR DESIRE ::
Max is always love to be in centre of attraction whenever he goes. He is showing his gentle yet classy attitude. He looked up and walked straight showing his confidence and superior himself. The red carpet and camera flashes correspond to his feeling as a celebrity, every time people want to take picture with him. The crown represent himself as a king in the house. A short brief is that he want to be filled with love inside his master house with his family members.
THEME 4 :: IDEA
Every time i brings Max go out to public park, he will be the main attraction for everyone. Although he is big, everyone seems to fall in love with him once they look at him. I suppose he has a very pleasant and friendly personality and he looks handsome in his shiny black fur and mischeivous eyes. Everyone likes to take photos with him which makes him used to that kind of situation. Max borned to be a friendly and happy dog. Even though sometimes he may be pissed off with some annoying people, he still does not bark at them. Instead he just ignores them and He willse to continue his walkor does whatever he is doing. After coming back from the public park, he will lay down and rest in his room. Here start his day dreaming again. He may be think that he is a celebrity with a lot of paparazzi following him during his walk!
Theme 3 :: MAX AND HIS SOARING OVER THE WORLD
:: MAX AND HIS SOARING OVER THE WORLD ::
Max likes to get out from his master house for walks. He is a playful though he is quite domestic. Human can predict dog's feelings by observing their body language itself and their usual behaviour by tail waving or letting its tongue outside. In this picture, Max is showing is playful body language by standing strong with slightly lower down his front body, swinging tail and the tongue at the side. Paper plane is one of the famous leisure games during childhood era. Proving that Max still live in a childish and unstressed life compared to other dogs. The flying paper plane also show Max likes to explore by his nose and ear to connect to world. Dog can sense smell about 50 to 100 times more powerful than human. The frequency range of dog hearing is about 40Hz to 60,000Hz.
Theme 3 :: IDEA
Max loves to go out. On weekends, if weather permits, i will take him for evening walk, play and socialising with his pals. When the time for outing comes, he just know the timing and jumps into car and sits comfortably waiting. He behaves very well especially inside the car. Every time i go out and leave him at home, he will show me his sad face. For this theme, he must be dreaming and imagining where i am going when i leave him alone at home. Not surprisinh, he will start his day dreaming while i am not around. He might be dreaming that he is happily free and simply flying to anywhere he wants without our control.
Theme 2 :: MAX AND HIS YEARNED FOR COURAGEOUSNESS
:: MAX AND HIS YEARNED FOR COURAGEOUSNESS ::
The warm and dark concept signify his scary and worried feeling. The old and abandoned site showing his feeling being forsaken and lonely. From his flying action in the picture, he wish to be free and spread away from the depression. Beside that, he wish himself to be an unicorn which is brave yet friendly and beautiful. It also fight many obstacles and at same time can be friendly to all his family and friends.
Theme 2 :: IDEA
I got the inspiration for this theme because Max is scared of the sound of thunder and fireworks. While everyone was happy celebrating this festive season, this was the time he hated most. When people played fire crackers and fireworks everyday during the festive season, he needed to hide under the table at the dark corner in his room. I wonder what was in his mind? Perhaps he imagined himself as an unicorn brave and courageous enough to go out and happily celebrate the festival with everyone.
Theme 1 :: MAX AND HIS GLUTTONY FANTASY
:: MAX AND HIS GLUTTONY FANTASY ::
This picture showing Max and his fun time smelling and eating fast food. It also represent the colourful hamburger to emulate his happiness. He hope in his heart to try tasty and edible food especially those food that humans usually eat. His expression with his wet tongue showing that he can not wait to taste this food. The big hamburger symbolize that he want extra, gigantic ones than a normal burger. Dogs as you would expect born to be greedy and uncomplicated eaters. Max can do any tricks in order to get good food as an incentive.
Theme 1 :: TUTORIAL
Max and his Gluttony Fantasy :: Tutorial
Before edit the pic with Adobe Photoshop (PS), get ready few photographs according to our sketching.
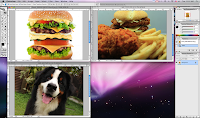
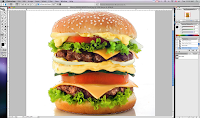
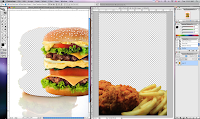
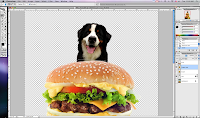
1 • Use [Magic Wand Tool (W)] and select the white background. PS will auto select the white background.
2 • Go to SELECT > INVERSE. PS will select the burger.
3 • After select the burger, go SELECT > FEATHER (use feather effect for more natural effect to the object). Minimize and keep this photo one side, and continue with other photos.
4 • Same steps for the next photo but the photo is not white background. Then use [Magnetic Lasso Tool (L)] and select which area that we want for our project.
5 • After select the object that we want, go to SELECT > FEATHER.
6 • Go EDIT > COPY > EDIT > PASTE to create a new layer for the object.
7 • Open the first photo and drag the selection object into the 2nd photo. It will create another layer for the object. Minimize and keep it one side.
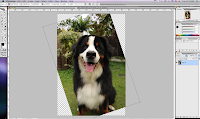
8 • Go EDIT > FREE TRANSFORM to rotate the photo.
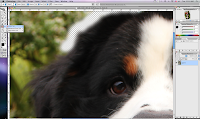
9 • The dog is fluffy and hairy. Use [Eraser Tool (E)] with hardness 0% to create an outline for the dog.
10 • This is the easiest way to maintain the fluffiness of the dog and looks more natural.
11 • After that, select the dog with [Lasso Tool (L)] and draw around the erased area. PS will select the dog.
12 • Drag the selection image to the previous photo and you will see all the 3 photos in the same file but different layers.
13 • Edit the object size with EDIT > FREE TRANSFORM
14 • For the hat of the dog, select Burger Layer and use [Lasso Tool (L)] to draw the shape of the hat.
15 • EDIT > CUT > EDIT > PASTE will create another layer for the hat. (Not advice to Paste it to the same layer because it will be troublesome if edit the hat or burger later.)
16 • Create a new layer for the background. Change the foreground color to Blue, and remain the background color as White.
17 • Go FILTER > RENDER > CLOUDS for the cloud effect.
18 • The clouds is too stiff and not natural. Create another new layer and apply [GRADIENT (G)] to the new layer.
19 • At the Layer window. Select the Gradient Layer and change it to OVERLAY.
20 • To create dreaming effect. Save the entire project to another file name.
21 • Merge all the layers to be one complete photo. Go FILTER > BLUR > GAUSSIAN BLUR and adjust the radius level.
22 • Drag the new blur layer into existing layers file and place it on top of all layers.
23 • Use [ERASE TOOL (E)] with 0% hardness and 50% flow to erase the blur layer, so the other layers at the back will appear.
TIPS :
i • Adobe Photoshop only allow one step UNDO from the shortcut key (COMMAND + Z). Allow to check and undo from the History window but up to 20 steps.
ii • Always duplicate another layer if not sure with the PS effect. At least a back up layer still around if not satisfy with the effects and colors.
Theme 1 :: IDEA
Concept Development~
"MIND MAP"
I usually start my design work leveling up with a "mind map". It may be messy and confusing for some people; however it is very helpful for me to focus for generalization and visualization that lead me to classify more ideas for design.
First time I was introducted how to use Mind Map when I was studying in my college and my module is on Creative Design. At first it is quite troublesome wasting time to understand how to use mind map as a standard guide. But eventually after some practise as time passed along, I found out that it is very useful for my design work. It is very straight forward and simpified. So what we can do is to choose the clear key words from mind map.
CONCEPT FOR MME7113
:: :: MAX IN HIS DREAMLAND :: ::
Theme 1 :: MAX AND HIS GLUTTONY FANTASY
Theme 2 :: MAX AND HIS YEARNED FOR COURAGEOUSNESS
Theme 3 :: MAX AND HIS SOARING OVER THE WORLD
Theme 4 :: MAX AND HIS MEGASTAR DESIRE
Theme 5 :: MAX AND HIS FEARLESS VALOUR
Theme 1 :: MAX AND HIS GLUTTONY FANTASY
Theme 2 :: MAX AND HIS YEARNED FOR COURAGEOUSNESS
Theme 3 :: MAX AND HIS SOARING OVER THE WORLD
Theme 4 :: MAX AND HIS MEGASTAR DESIRE
Theme 5 :: MAX AND HIS FEARLESS VALOUR